Difference between revisions of "How to Add a New TV Series"
(Created page with "Step 14 - Before configuring Media Center Master to add a new TV Series to the collection, it is important for the user to know the correct name and spelling of a current airing ...") |
|||
| Line 1: | Line 1: | ||
| − | Step | + | [[How_to_Customize_Media_Center_Master_for_First_Run#top|Back to How to Customize Media Center Master for First Run]] |
| + | |||
| + | <blockquote><blockquote><blockquote style="border: solid medium grey;"> | ||
| + | ''This is the '''<u>second step of a two (2) part outlined process</u>''' to define: the specific settings of; the complete set-up configuration, which will ensure the downloading of a minimum of one (1) up to a maximum of five (5) TV Series Episodes during the first run.'' | ||
| + | *''Choose, only, one (1) TV Series.'' | ||
| + | </blockquote></blockquote></blockquote> | ||
| + | |||
| + | <blockquote><blockquote><blockquote style="border: solid thin grey;"> | ||
| + | *''The main goal of this section is for the user to <u>choose a TV Series which is popular to the viewing general public</u>, thereby providing a good number of torrents in the availability pool for downloading during the test run.'' | ||
| + | </blockquote></blockquote></blockquote> | ||
| + | |||
| + | Step 1 - Before configuring Media Center Master to add a new TV Series to the collection, it is important for the user to know the correct name and spelling of a current airing TV Series with new episodes being shown weekly. A good place to make sure of this is to visit the EZTV[http://eztv.it/showlist/ Show List] page. | ||
*Begin with changing the "Filter Show List by Status:" to "Airing" with the "pull down menu" button (∨), to get the current airing TV Series. | *Begin with changing the "Filter Show List by Status:" to "Airing" with the "pull down menu" button (∨), to get the current airing TV Series. | ||
*Pay close attention to the "Status" of the shows, "Airing: Irregularly" or "Airing:..." | *Pay close attention to the "Status" of the shows, "Airing: Irregularly" or "Airing:..." | ||
| Line 6: | Line 17: | ||
*Return to Media Center Master | *Return to Media Center Master | ||
| − | [[File:46.eztv.airing,.show.list.png| | + | [[File:46.eztv.airing,.show.list.png|700px]] |
| + | Step 2 - Open the "Add a T.V. series..." window through the "Media" menu. | ||
| − | + | [[File:43.mcm.open.add.tv.series.png|700px]] | |
| − | + | Step 3 - Click on the single listing, to select and highlight the "Folder to auto-scan" (TV Show Archive folder location), click "Next." | |
| + | [[File:44.mcm.add.tv.select.folder.png|500px]] | ||
| − | Step | + | Step 4 - The name for the TV Series used in the this example, Covert Affairs, is used for demonstration purposes, only. The user should not use it for a first run testing. |
| − | + | ||
| − | + | ||
| − | + | ||
| − | + | ||
| − | + | ||
*Paste the name of the chosen TV Series selected above into the "Search by title:" blank area, | *Paste the name of the chosen TV Series selected above into the "Search by title:" blank area, | ||
*Click the "Search" button, after a few seconds, the chosen TV Series information should show in the "Selected T.V. series:" area, | *Click the "Search" button, after a few seconds, the chosen TV Series information should show in the "Selected T.V. series:" area, | ||
| − | *If the TV Series is listed, click the "Next" button then continue to Step | + | *If the TV Series is listed, click the "Next" button then continue to Step 5. |
| − | *If the TV Series does not show up, go back to Step | + | *If the TV Series does not show up, go back to Step 1, pick a different show, and repeat Steps 2 and 3. |
| − | [[File:45.mcm.add.tv.series.covert.affairs.png| | + | [[File:45.mcm.add.tv.series.covert.affairs.png|500px]] |
| − | + | Step 5 - Assuming all of the data provided to the internet sites used for this step is up to date, there should be a "Confirm Settings:" listing showing "Status: Continuing" for the selected show. | |
| − | Step | + | |
*The check box for "Keep this series up to date with new episodes" should have a check in it. | *The check box for "Keep this series up to date with new episodes" should have a check in it. | ||
| − | *If the check is present, click the "Finish" button to close the "Add a T.V. Series..." window and continue to Step | + | *If the check is present, click the "Finish" button to close the "Add a T.V. Series..." window and continue to Step 6. |
| − | *If the check is not present, go back to Step | + | *If the check is not present, go back to Step 1, pick a different show, and repeat Steps 2 - 4. |
| − | [[File:47.mcm.add.tv.series.finish.png| | + | [[File:47.mcm.add.tv.series.finish.png|500px]] |
| − | + | Step 6 - There should now be an entry added to the "Media in your collection:" | |
| − | Step | + | |
*At the top, left, the name of the selected show with some date related to it is shown. | *At the top, left, the name of the selected show with some date related to it is shown. | ||
*In the middle, right, the log shows the processes of what Media Center Master did, during the adding of the new TV Series. | *In the middle, right, the log shows the processes of what Media Center Master did, during the adding of the new TV Series. | ||
*At the bottom, right, there is a graphic representation of the data fetched by Media Center Master for the new TV Series. | *At the bottom, right, there is a graphic representation of the data fetched by Media Center Master for the new TV Series. | ||
| − | [[File:48.mcm.new.tv.series.metadata.added.png| | + | [[File:48.mcm.new.tv.series.metadata.added.png|700px]] |
| + | |||
| + | [[#top|Back to Top]] | ||
Revision as of 19:45, 6 August 2011
Back to How to Customize Media Center Master for First Run
This is the second step of a two (2) part outlined process to define: the specific settings of; the complete set-up configuration, which will ensure the downloading of a minimum of one (1) up to a maximum of five (5) TV Series Episodes during the first run.
- Choose, only, one (1) TV Series.
- The main goal of this section is for the user to choose a TV Series which is popular to the viewing general public, thereby providing a good number of torrents in the availability pool for downloading during the test run.
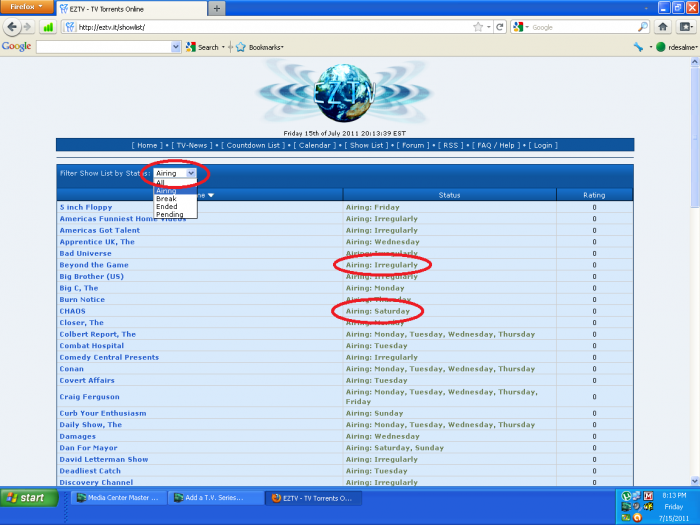
Step 1 - Before configuring Media Center Master to add a new TV Series to the collection, it is important for the user to know the correct name and spelling of a current airing TV Series with new episodes being shown weekly. A good place to make sure of this is to visit the EZTVShow List page.
- Begin with changing the "Filter Show List by Status:" to "Airing" with the "pull down menu" button (∨), to get the current airing TV Series.
- Pay close attention to the "Status" of the shows, "Airing: Irregularly" or "Airing:..."
- Pick a TV Series, making sure it is an "Airing:..." series.
- Highlight the complete name with the left mouse button to select it for copy and pasting into Media Center Master.
- Return to Media Center Master
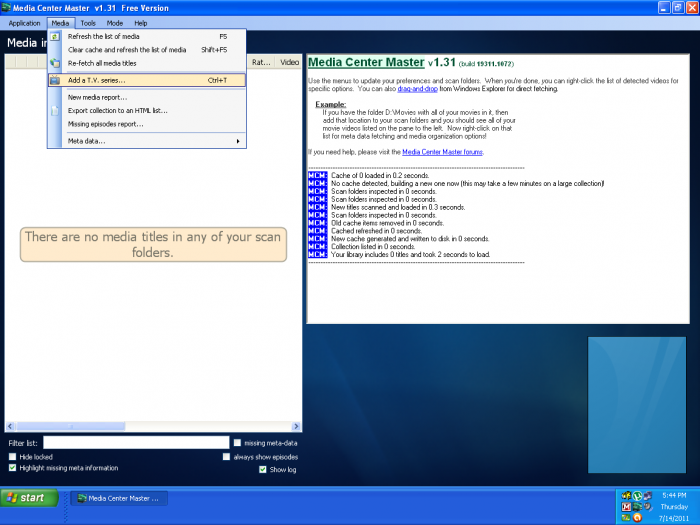
Step 2 - Open the "Add a T.V. series..." window through the "Media" menu.
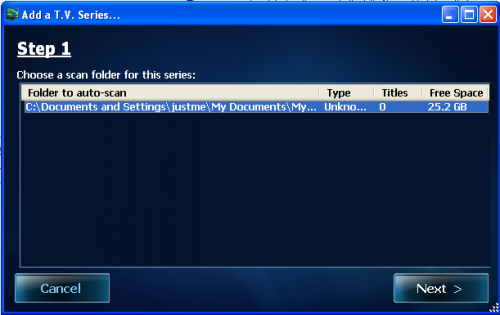
Step 3 - Click on the single listing, to select and highlight the "Folder to auto-scan" (TV Show Archive folder location), click "Next."
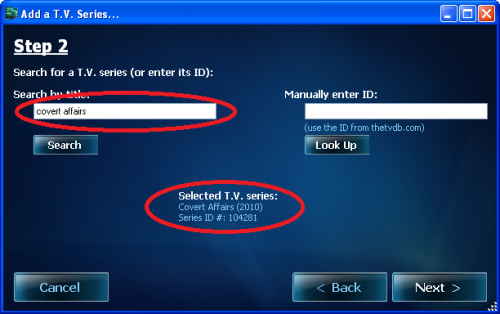
Step 4 - The name for the TV Series used in the this example, Covert Affairs, is used for demonstration purposes, only. The user should not use it for a first run testing.
- Paste the name of the chosen TV Series selected above into the "Search by title:" blank area,
- Click the "Search" button, after a few seconds, the chosen TV Series information should show in the "Selected T.V. series:" area,
- If the TV Series is listed, click the "Next" button then continue to Step 5.
- If the TV Series does not show up, go back to Step 1, pick a different show, and repeat Steps 2 and 3.
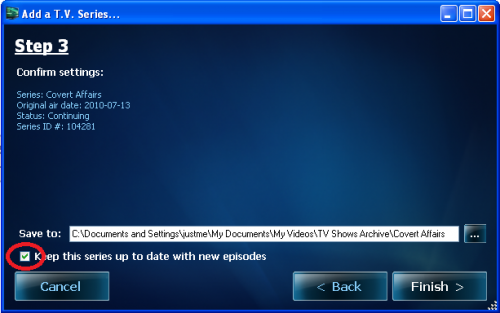
Step 5 - Assuming all of the data provided to the internet sites used for this step is up to date, there should be a "Confirm Settings:" listing showing "Status: Continuing" for the selected show.
- The check box for "Keep this series up to date with new episodes" should have a check in it.
- If the check is present, click the "Finish" button to close the "Add a T.V. Series..." window and continue to Step 6.
- If the check is not present, go back to Step 1, pick a different show, and repeat Steps 2 - 4.
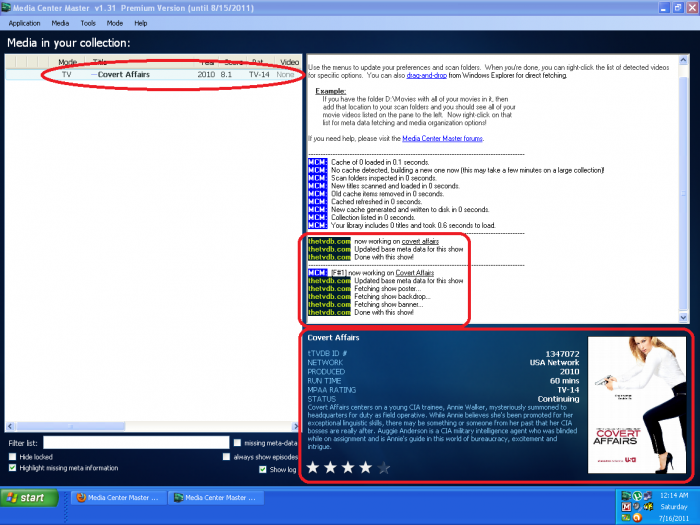
Step 6 - There should now be an entry added to the "Media in your collection:"
- At the top, left, the name of the selected show with some date related to it is shown.
- In the middle, right, the log shows the processes of what Media Center Master did, during the adding of the new TV Series.
- At the bottom, right, there is a graphic representation of the data fetched by Media Center Master for the new TV Series.


